

|
Scratch Art is a graphic technique. It is used to create value drawings. Most common is a black-and-white technique. Also popular are metallic backgrounds – they make a drawing look like etching.
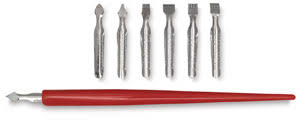
Scratch board is a paper (or foil) board that is covered with wax or gesso and coated over with black ink. Using scratch tools (stylus, scratch brush, or scratch knife) you can create value drawings by scratching off the black ink and revealing the board beneath. This technique is similar to drawing with white pencil over a black paper. |
|
|
.Scratchboard History
Scratchboard or scraperboard (as it is known as in Europe) is a direct form of engraving/etching which originated in the UK and Europe in the 19th century prior to the introduction of modern photographic techniques and was used as a less expensive alternative to other engraving/etching substrates such as metal - copper and steel plating; woodcuts, linocuts, etc; and could be photographically reproduced in smaller formats without losing too much detail. Scratchboard was used widely for scientific illustration ie: botanical, zoological, anatomical; in maps, and product advertising illustration in magazines, newspapers, and books . . . The very first scraperboards originally consisted of cardboard or other stiff paper coated with chalk or china clay. Scraperboards used during the 1930's were white with no ink coating. http://animalfineartbycheryl-ann.com/index.asp?ID=26 |
STUDENT EXAMPLE 2020

STUDENT EXAMPLE 2021

|

|
You can use a variety of strokes as you scratch. Depending on the object that you are working on – you should use different value techniques to show texture of this particular object. As a rule – USE SMALL STROKES!!!! Smaller the stroke – easier it is to control the scratching process. Remember, you cannot “undo” or erase a scratch. Once it is there – it stays. That’s why it is a good idea to take your time and scratch with smaller strokes – in case you mess it up – you still might be able to fix it and not start over. Which saves time in a long run! Another rule – don’t press too hard on the tool – it will rip the paper. TAKE YOUR TIME!!!! . |
|
EXAMPLES OF VALUE SCALES

|
PRACTICE 1: VALUE SCALE
Watch the video on the left to understand how to create a value scale. As you can see it is possible to show values and textures just by scratching small strokes. Assignment: Create 3 value scales, similar to the example of the left. Each scale should be 1 inch x 6 inches long. with 6 one inch boxes. Value Scale 1: Hatching technique Value Scale 2: Crosshatching technique Value Scale 3: Stippling technique Take an image of your value scales and upload them into your online portfolio. No reflection is required. |
|
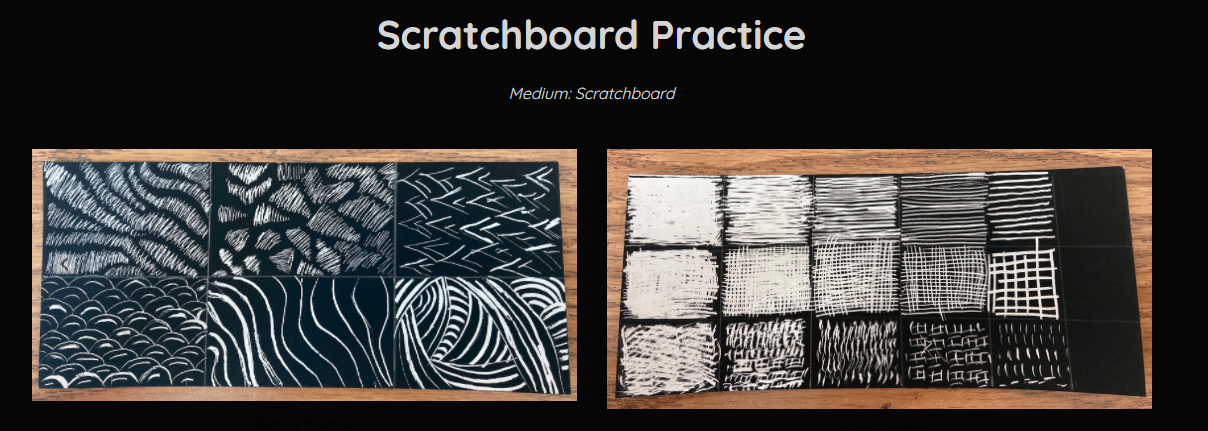
Practice 2: Texture Experiments
Each student will be provided a piece of scratchboard to practice creating texture. Use the example of the right as a reference. Assignment: Select 6 textures that you want to practice. Divide the piece of scratchboard into 6 sections and try to copy the patterns and textures the best you can. |

|
Take an image of it and upload it into your online portfolio. No reflection is required. (See example below)
THE SCRATCHBOARD PROJECT (100 POINTS)
|
What NOT to do!!


|
What to do!!

STUDENT EXAMPLE: 2020 QUARENTINE PROJECT
|
THE SCRATCHBOARD PROJECT:
HOW TO TRANSFER AN IMAGE ONTO SCRATCHBOARD
STEP 1: PRINT OFF A BLACK AND WHITE IMAGE OF AN ANIMAL
(HINT: Animal texture works really well for scratch board but feel free to mind another subject if you want)
(HINT: Animal texture works really well for scratch board but feel free to mind another subject if you want)

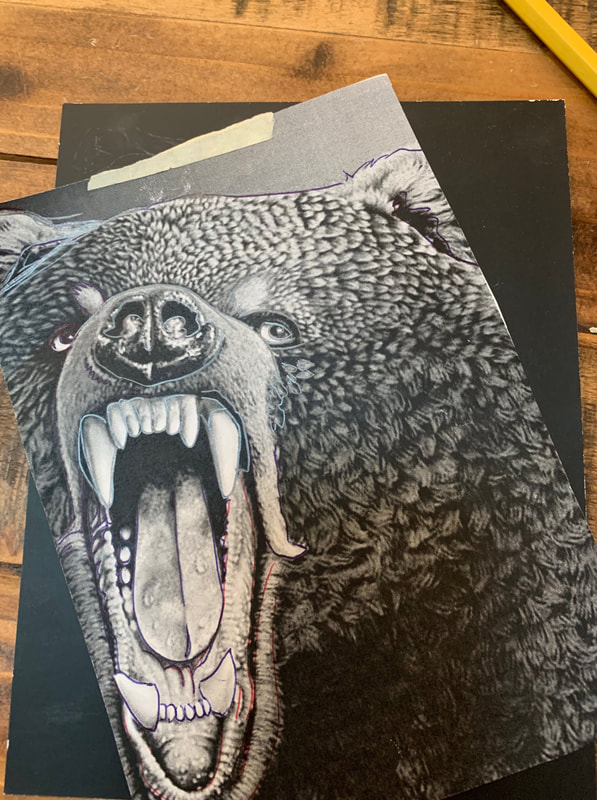
STEP 2: Use a pencil and scribble on the back of your image. Fill it in the best you can.

STEP 3: USE A PENCIL OR PEN AND TRACE YOUR IMAGE ON THE SCRATCH BOARD
|

|

|
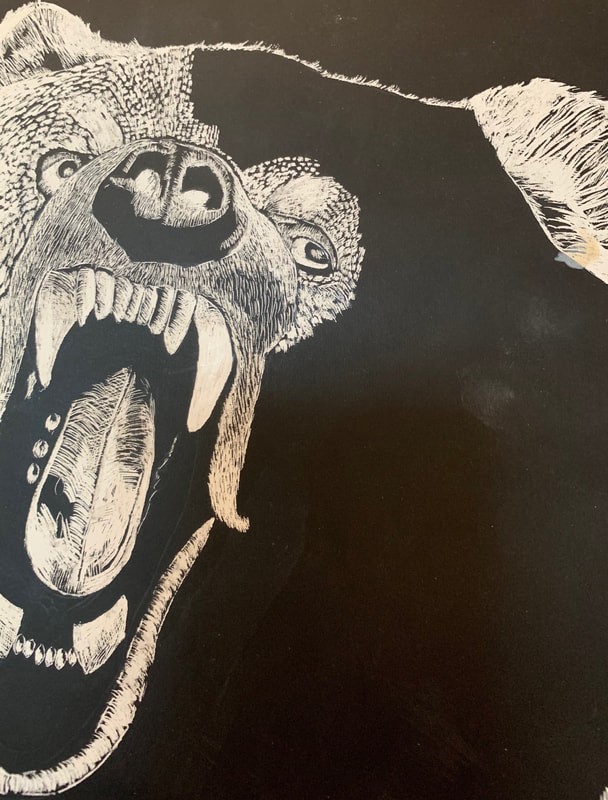
STEP 4: IDENTIFY THE HIGHLIGHTS IN YOUR IMAGES AND USE YOUR SCRATCH TOOL TO REMOVE THE BLACK AREAS. BE CAREFUL NOT TO PUSH TO HARD.
|

|

REFERENCE VIDEO
Try your best to show values within your design. Remember dark and lights are key for getting an A on this project. Take your time. Go slow. Make every stroke and mark have a purpose.

Look at the example below. See the different types of strokes? What lines do you see? What directions are the lines going? That is how you create an interest in your drawing. But remember, that each type of stroke should be appropriate and planned. Keep in mind that longer strokes are harder to use and control. If you don’t believe me – try… (on a scrap piece, of course….)
Small strokes are great for details!
Remember to replace the blades for your scratch knives!
Small strokes are great for details!
Remember to replace the blades for your scratch knives!

GRADING RUBRICS:
100: SCRATCH BOARD PROJECT:
100: SCRATCH BOARD PROJECT:
- Use up space (Draw large an make sure your drawing uses as much of the scratch board as possible)
- Show texture. Focus on the details, fur, scales, of your animal.The more realistic the better the grade. Use at least 5 different types of line.
- Show value. Make sure that you show dark and light values whenever possible.
- Balance. Find a way to balance your positive and negative spaces equality. (not to much black and not to much white.)
- Demonstrate craftsmanship and neatness. Your best work and effort must be shown. The trick is doing your best, going slow, and focusing your attention on the values and gradations.
- Directions are followed.
TECHNIQUES AND NOTES
EYES
Technique: I use a crosshatching pattern to create eyes. I find that this creates the smoothest gradients. By using this type of stroke I am also setting my eyes apart from all the other textures in the piece as this area is the only place where cross-hatching is present, besides noses. This helps them to read as 'different' when set against fur. It is common to render the eyes as a series of strokes that radiate out from the pupil like a starburst. People tend to make these strokes vary in weight to give the eye those natural variations. Upon inspecting eyes, however, you will notice that the transitions are much more subtle and tend to not be straight lines.
Imperfections: Eyes can present several imperfections. The most notable are spots and natural variations in the pigmentation of the iris. The second is the discharge that forms in the tear ducts. In "Cautious Observation" (detail, right side) you can see that I have added these 'eye boogers' rather than leaving them out.


NOSES
Technique: Noses are rendered with a mixture of cross hatching, similar to eyes, and stippling. Again, using these strokes helps to create a texture that is drastically different than fur and will allow these parts to stand out. Noses of canines are often moist and can have strong, bright highlights under the right lighting conditions. If you observe the texture of the canine nose up close you will find that it is actually made up of little 'cell' shaped formations. When rendering your subject up close, or at a large scale, make sure to include these. Feline subjects have a more subtle nose texture, but it is still present. For subjects at a distance this texture is usually omitted. Also note the texture where the muzzle fur meets the nose and the skin can be seen through the sparse hairs.
Imperfections: Noses can come with a variety of imperfections. These include scars, scuffs, and various debris that stick to them. Things such as loose hairs, dirt, tiny bits of grass, etc can sometimes be found clinging to a wet nose. Those who have outdoor dogs are familiar with this.


FUR
Techniques: Fur comes in variety of lengths and textures. Pay attention to the direction and texture of the fur you are rendering. Often, people render fur as long or short lines following the growth pattern. If you look at a real animal's coat however you will find that hairs tend to have natural variation and are often not 'neat' at all. I use small groupings of several scratches together to create the texture for short fur, such as that found around the eyes and on the muzzle. For longer hair I will use slightly 'wiggly' strokes to simulate the 'scraggly' look.
Imperfections: The most common imperfections found in fur are scars, bent/loose hairs that are still clinging to the coat and debris from the environment. Grass, small leaves, burrs, etc will often find their way into an animal's coat, especially along the legs, belly, and chest. If the animal lays with it's head on the floor, it's not uncommon to find these in the cheek fur too! Scars usually are present on the face, although they can be found on the legs too. They are most noticeable in short fur and will be present as dark areas without fur. Because the scar is an indentation, pay special attention to the highlights and shadows on either side of the scar. The scar is essentially 'embossed' into the fur. These highlights and shadows are very important and will give your scar depth and make it believable. Pits and areas where the fur is clumped together are also prevalent. Watch for these! Fur is seldom 'perfect'. These pits are most common on the foreheads of canines, but also occur in the long neck fur of canines and felines alike.


