

Vocabulary:
Primary Colors--The primary colors are those which cannot be created by mixing other colors in a given color space. These colors are RED, YELLOW, and BLUE.
Secondary Colors-- when you mix two primary colors together you create a secondary color.
- Yellow + Red = ORANGE
- Red + Blue = PURPLE
- Blue + Yellow = GREEN
Intermediate Colors--when you mix a secondary color and a primary color you create an intermediate color.
- Yellow + Orange = YELLOW/ORANGE
- Red + Orange = RED/ORANGE
- Red + Purple = RED/PURPLE
- Blue + Purple = BLUE/PURPLE
- Blue + Green = BLUE/GREEN
- Yellow + Green = YELLOW/GREEN
Tint--color plus white; lightens the color; Tint can range from slightly lighter than your original color, all the way to White with barely any of the color mixed in.
Tone--as any Hue or mixture of pure colors with only Gray added; this will reduce the intensity of the color.
Shade--color plus black; pure Hue or mixture of pure colors with only Black added. In other words, it contains absolutely no White or Gray.
Complimentary Colors--Colors that are opposite the color wheel.
Analogous Colors--three colors next to each other on the color wheel.
Monochromatic Colors-- One color plus it's values
Materials:
Vanilla wafers
Pillsbury Vanilla Frosting
Package of food coloring
Styrofoam bowls/plates
Napkins/paper towels
Plastic knives/craft sticks/spoons
Procedure:
1. Scoop frosting into three bowls and use food coloring to dye one each red, yellow, and blue. Cover (hide) and set aside.
2. As students come into room, have them sit in groups of three or four.
3. Begin introduction or review of color theory by asking them to name the three primary colors. Once they have correctly identified these, uncover the bowls.
4. Using a spoon, scoop frosting of each color onto a Styrofoam plate, one for each group of students. While doing this, continue to ask students questions (i.e. "what are the secondary colors and how do you mix them?" etc. Adapt questions according to age group and prior exposure to color theory concepts.)
5. Pass out plastic knives or craft sticks, one per person. Ask MORE questions about color theory (i.e. "what are complementary colors and what is their relative position on the color wheel?" etc.) Give each group a plate with frosting on it, and either a second empty plate or a large paper towel.
6. Produce a box of Vanilla wafers from a bag, and pass out at least 13 cookies to each group, placing cookies on empty plate or paper towel.
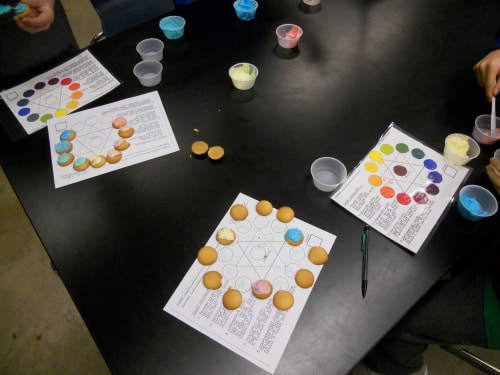
7. At this point, the light will probably begin to dawn for the students and they will understand what they are to do! Explain that they will be working as a team to produce a color wheel, using Vanilla wafers and frosting to create primary, secondary and tertiary colors, as well as a neutral.
8. Remind students to wipe off the stick (DON’T LICK IT!) in between colors so as not to contaminate the purity of the primary colors.
9. Once the color wheels have been finished and have been checked for color accuracy and correct placement, students may eat their work!
Notes: I wish I could take credit for this idea, but I came across it in the ArtsEdNet list and just recently learned that it was developed by Susan Hildreth. Many thanks and much appreciation for this wonderful lesson plan!!
This worked EXTREMELY well with my 5th through 12th grade students, and days later they were still talking about how much they enjoyed it!
This may be extended by having them eat a color and its complementary. Or say that they can start by eating analogous colors--or only the tertiaries. Whatever!
Clever students (who want more cookies) may suggest that they show their proficiency in color mixing by producing tints. Or doing a "tint strip" by choosing a color and adding white to a series of cookies.
Amazingly, I only used 2 containers of frosting for 50 students—I’d bought 6 containers. On the other hand, I used 3 boxes of Vanilla wafers in order to be able to use all unbroken cookies.
Adapt this as desired, and enjoy!
This would also be a GREAT lesson plan to use for an art job interview that involves a panel!!
